Showing posts with label Free Tutorials. Show all posts

August 1, 2012

Mother And Child Felt Doll Pattern/Free Dolly Felt Doll Pattern


Mommy measures 6 1/4" high and child measures 5 1/8" inches high when completed. The Child has her own dolly to play with and I'm gifting you with the dolly pattern for you to download and make for free.

The pattern is now available to purchase on my etsy shop or on my blog...to shop here just scroll down and it's on the right hand side bar.

I may take longer than usual to post because I have a mood disorder [anxiety]... I get really fatigued so I pace myself when I create. So I apologize for the long wait to my followers. 

I have one more pattern to finish before the speedy giveaway. I've been waiting to, the Bunka Japanese doll in felt.


Enjoy Making The Dolly!


Read instructions below then
download the pattern here.

Materials Needed
felt [color of your choice] embroidery floss or sewing thread [color of your choice], fabric or tacky glue, scissors of course, and maybe some embellishments like 1/8" wide ribbon, a small flower. or micro buttons.
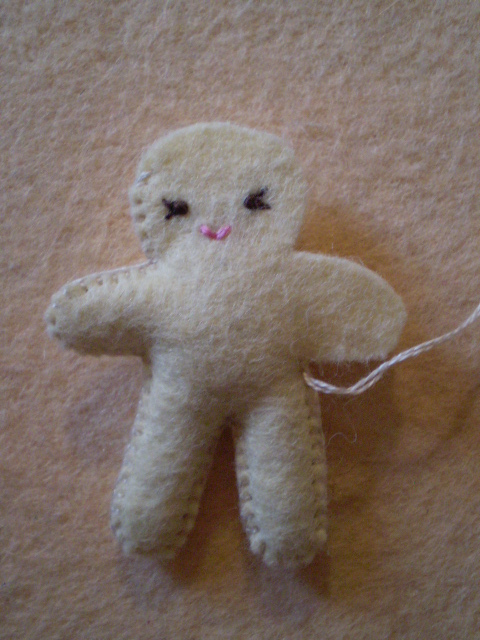

Create eyes with a french knot and a few straight stitches for eyelashes.
Make a V stitch for mouth.
Stitch the shoulders of the dress.


Whip stitch using two floss strands or three sewing threads around the body...stuff the arm and leg at this point.


Stuff the second leg at this point.


Stuff the second arm at this point.


Finally stuff the head and stitch it closed.


Whip stitch the sides of the dress.


Take some embroidery floss and sew it on top of the dolly's head.


Sew the hair around middle to bottom of the head.


Separate the hair in two parts and tie with a ribbon.
Glue a bow on the dress.


Happy Crafting!

July 23, 2012

Tutorial on how to make the eyes and mouth/Jazzy The Jazz Dancer New Felt Doll


Jazzy The Jazz Dancer inspired by my niece [pictured below] who has been in dance school since she's was about 5 years of age. She is now 13 years old.

Jazzy the jazz dancer measures 7 3/4" measures high when completed. She's available here on my blog as a pattern for sale or on my etsy shop...to shop here just scroll down and it's on the right hand side bar.

 I'm currently making the Mother And child felt doll pattern and the Bunka Doll [Japanese] felt doll pattern. I'm like a chicken without it's head going bonkers because I have so many other idea's install for creating more felt doll patterns and new cloth doll patterns that's it's giving me too much of a rush...I need to lay down for a moment...Whooo, focus, focus, focus...

Get ready for another speedy giveaway when I finish the mother and child/bunka doll felt pattern. You'll have the honors of picking a pattern of your choice for the first seven followers and guests who enters.

I have reduces the prices on all my patterns for many to enjoy making them.


My 13 year old niece name Jazzell. She looks more like me than she does my sister. I so love her.


A sneak peak at Mother And Child felt doll pattern. This is the mother.


Tutorial On Making The Face.


Make your markings for the eyes nose and mouth. Using two strands of embroidery floss or three strands of sewing thread back stitch the eyelid and then add your eyelashes.


Stitch a V for the eyes.


Fill in the eyes with small whip stitch stitches with two strands of floss or three strands of sewing thread.


 With two white floss strands make french knots or a different stitch you desire.


Nose - Use two floss strands or three strands of sewing thread and just make a small straight stitch across.

Mouth - Use two floss strands or three strands of sewing thread back stitch the mouth in a slight arch.


  Stitch a V for the bottom lip and just fill in with small stitches [see picture below]. 
 

 I told you it was easy. 

Enjoy!


November 29, 2011

Vanity And Chair Tutorial


This is simply made with 2 small matchboxes, cardboard, contact paper, small amounts of fabric, beads, thin wood sticks, and some embelishment notions.


And HAPPY BIRTHDAY to me today!


Enjoy


Vanity Tutorial 1


Chair Tutorial 2


September 11, 2011

How To Make A Doll Table And Chairs Video Tutorial


 Table and chairs made with cardboard and decorated with fabric, ribbon, and satin roses. It's simple than it looks. The decorations makes it look difficult. The cardboard is covered with contact paper. Click here for pdf template. For further instructions watch attached videos. 


Enjoy!


Making Table 


Making Chairs 1


Making Chairs 2


August 28, 2011

How To Make A Doll Closet From A Sugar Box Video Tutorial


To make this closet I used a Sugar In The Raw Box, 2 different contact paper, a dowel, acrylic paint, earings and jewels to create the door knobs, and cardboard scraps.

Note: I suggest using a darker color contact paper for the outside because the writing shows through with light colors


I made the hangers using wire I bought from the hardware store.


ENJOY THE VIDEO TUTORIAL


July 4, 2011

Toothpick Doll


These are dolls I made with toothpicks and embroidery floss. This lovely idea is created by Angela Michelle Dolls. This one Measures 2 1/2 inches tall. I enjoyed making it. My 11 year old son also made one, But he wants to draw a backdrop for his before I take pictures.


I decided to paint a face. The Tutorial on making the head differ's from what I did. I used a 7mm wood bead to help me make the head.


June 17, 2011

Video Tutorial...Dollhouse/carry along case made with a pizza box


 This dollhouse/carry along case was made with a store bought pizza box.


I used contact paper that only costs $1.99 per roll, hot glue gun, extra card board to make it sturdy, ribbon and buttons for closure, and rope trim for a handle...oh yeah and sissors of course. You can make this dollhouse/carry along case with any size box to fit the size of your dolls using the same technique as in the video tutorial will demonstrate.

There are walls that are created to go to the next room/dollhouse/carry along case and it will be able to fit right inside the box for storage. You will also be able to stack them on top of each other to give them the effect of a second floor 


The Blossom Petal's with the new head's. These new dolls now only measure about 8 inches tall...they use to measure about 8 1/4 inches tall.

Enjoy the video tutorials!

Tutorial #1


Tutorial #2


Tutorial #3


Tutorial #4


Tutorial #5


Tutorial #6


January 14, 2011

Baby Got Clothes! And Eyelash Tutorial.


I'm drawing a blank in naming this one. Any suggestions are welcome.

Her Name Is Amanda.


Just in time for Valentines.


Amands is wearing Tibitan Lamb for hair.


This is a pdf format file. Please be patient...it takes time to upload due to the file size

Related Posts Plugin for WordPress, Blogger...